Dovetail joint
Corner · Visible · Hand or power · Difficulty 4/5
A dovetail joint connects two boards at a corner with interlocking wedge-shaped tails and pins. The flare of the tails means the joint resists being pulled apart in one direction mechanically, not just by glue, which is why it is the traditional choice for drawer fronts and box corners.
The 3D viewer stopped.
Mark out (1 of 4)
- Also called
- through dovetail, dovetail corner joint
- Family
- Corner · end interlock
- Joins
- two boards at a corner
- Typical use
- drawer fronts and sides; box and case corners; blanket chests
- Holds against
- Pull-apart, Racking (qualitative)
- Difficulty
- 4/5
- Tools
- marking gauge, dovetail saw, bevel-edge chisels, mallet, dovetail marker or sliding bevel
On this page
How the parts fit
Seated, the tails and pins finish flush at the outside face, and every shoulder bears on the end grain of the board it meets.
A through dovetail joins the end of one board to the end of another at a right angle. One board carries the tails, the other the pins, and the second is cut from the first rather than from a shared drawing: the tails are sawn, then traced onto the pin board so every socket matches its own tail.
Three pairs of surfaces do the work. The angled cheek of each tail bears on the angled cheek of the pin beside it; both are sawn along the length of their own board, so this is long grain on long grain, the surface glue holds best. The base of each tail sits on its socket floor, a recess cut into the pin board’s end to exactly the thickness of the tail board. That floor is a positive stop: when the tails bottom out, the shoulder is tight and the corner is square. The flat sides of tails and pins touch last and stop the corner twisting.
The insertion axis is single. Stand the pin board upright with its socketed end up; the tail board comes down onto it along the pin board’s length until the shoulder lands. That is the only direction the joint opens easily. The taper lies in the other plane, across the pin board’s end, so pulling the tail board away along its own length drags the wide end of each tail into the narrow gap between two pins, and the wood refuses. A drawer uses exactly that: tails on the sides, pins on the front, and the pull of a loaded drawer is the direction the geometry blocks.
Both sets of end grain show. Cut tails and pins a whisker long and plane them flush after glue-up.
When to use a dovetail (and when not to)
Use a dovetail where a corner is pulled in service and is also seen: drawer sides into fronts, box and blanket-chest corners, small solid-wood carcases. It holds its own position while the glue sets, which keeps clamping simple.
Below roughly 9 mm3/8 in of stock there is too little material at a tail’s narrow base, and the edge half-pins turn to fragile short grain. Skip it for T connections and end-to-end joins, where a mortise and tenon or a scarf belongs. Skip it in sheet goods, where plywood tails crumble and veneered faces chip. And skip it on painted production work with a box joint jig already set up.
Layout and cutting, step by step
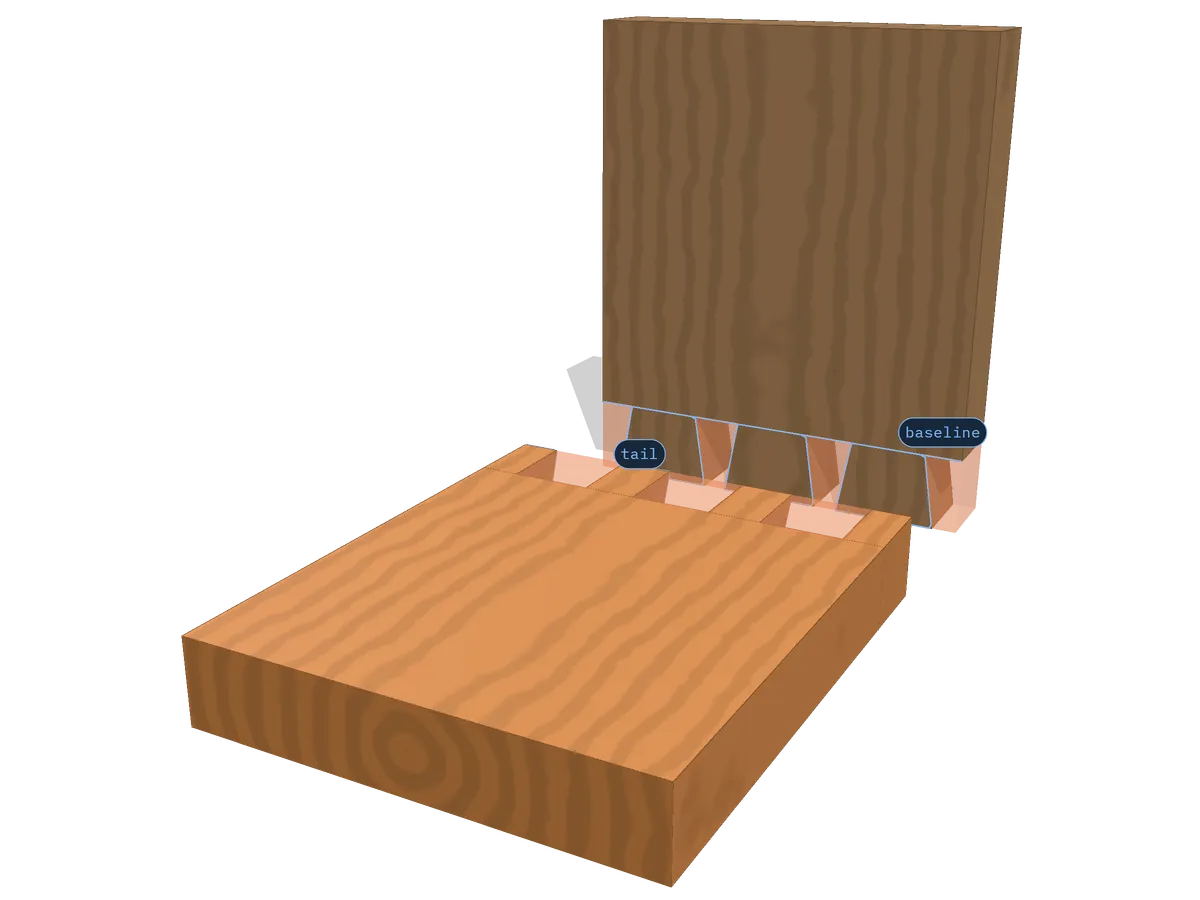
Marked out, the tail board carries a baseline on all four sides and shaded waste between every pair of tails; not a cut has been made yet.
- Mill both boards to final thickness and square both ends. Mark the inside face of every piece and number the corners so no board can be flipped by mistake.
- Set a marking gauge to the pin board’s thickness and scribe a baseline right around the end of the tail board. Reset it to the tail board’s thickness and scribe the pin board. Each board is gauged from the other’s thickness, never its own.
- Lay out the tails on the tail board’s end grain: a half-pin at each edge, tails spaced between. Set a dovetail marker or sliding bevel to 1:8 for hardwood or 1:6 for softwood, carry the slope down both faces to the baseline, square the lines across the end grain, and shade the waste.
- Saw the tail cheeks to the baseline with the whole kerf in the waste. Stop at the line, not through it.
- Coping-saw the waste between tails, keeping clear of the baseline, then pare to the scribed line from both faces toward the middle so the far face cannot blow out. Take the half-pin wastes last.
- Transfer. Clamp the pin board upright with its end level, stand the tail board on it with the inside faces together and the baseline on the pin board’s inside face, and knife around every tail onto the end grain. Square those lines down to the pin board’s baseline.
- Saw the sockets on the waste side of the knife lines, chop the waste from both faces, and pare each socket floor very slightly hollow so the shoulder pulls tight at its edges.
- Test-fit by pushing the tails in by hand about a third of their length, then stop. Seating that far under hand pressure, and needing a mallet tap for the rest, is right.
Common mistakes
Push the tails in dry and stop where they stop. A joint that will not go the last third is naming a surface, not asking for a mallet.
Gauging both baselines from the same board ruins more first attempts than anything else: the shoulders end up proud or sunk by exactly the difference in thickness, and paring will not fix it cleanly. Sawing on the line rather than beside it is the second, because half a kerf is the difference between a joint that needs a mallet and one that falls together.
Read a bad test-fit instead of forcing it. Stopping early with the pins bowing outward means one or two proud cheeks, not general tightness: push dry, pull apart, find the burnished spots, pare only those. Gaps beside the pin ends mean the saw went past the knife line. Closing everywhere except at the shoulder means a socket floor high in the middle. Parts that slide together with no resistance were sawn on the wrong side of the line, and that corner will hold on glue alone.
Repeated full dry-fits crush the cheeks and leave the glued joint loose. Flooding a tight socket with glue locks it hydraulically before it is home. Forcing a joint splits a half-pin through its short grain, the one break that cannot be pared away.
Dovetail joint vs box and rabbet joints
Choose a dovetail where a corner must resist a pull and show; a box joint trades that for an easier cut, a rabbet for a hidden step.
A box joint uses straight, square fingers at the same corner. Nothing tapers, so nothing resists withdrawal mechanically, but the interleaved fingers give a large long-grain gluing surface. A table-saw or router jig cuts it, spacing is uniform, and the corner reads as an even checkerboard.
A rabbet joint is faster still: a step in the end of one board, the other sitting into it. One setup produces it and it locates the corner, but most of the contact is end grain on long grain, so it usually wants nails, screws or pins as well. It belongs on utility boxes and case backs.
The dovetail costs the most bench time of the three. Spend it where the corner is pulled in use and will be looked at.
Variants
Half-blind dovetail. The sockets stop short of the pin board’s outside face, so nothing shows from the front. The traditional drawer-front joint.
Sliding dovetail. One long tapered tail runs in a matching housing. A T connection rather than a corner, used for shelves in solid-wood carcases and legs into a pedestal.
Mitered (secret) dovetail. The interlock hides behind a mitre line, for casework that wants the interlock without the pattern.
Machine-cut dovetail. A jig and a dovetail bit cut pins and tails together; regular spacing and wide pins are the tell.
Frequently asked questions
Why does a dovetail joint resist pulling apart?
Each tail is wider at the end of the board than at its base, so it is trapped between two pins. Pulling the tail board away from the pin board tries to drag the wide part of the tail through the narrow opening between pins, and the wood itself stops it. Glue adds to this; the geometry does the main work.
What dovetail angle should I use?
Common layout slopes are 1:8 for hardwoods and 1:6 for softwoods. Steeper slopes lock more firmly but leave short grain at the tail tips; shallower slopes are cleaner to cut but hold less. Either works for furniture; consistency across the joint matters more than the exact number.
Can you cut dovetails with a router?
Yes. A dovetail jig guides a router with a dovetail bit and cuts pins and tails together, usually with equal spacing. Hand-cut dovetails let you vary spacing and use narrower pins, which is the usual visual tell between the two.
Is a dovetail joint the same as a box joint?
No. A box joint uses straight, rectangular fingers and relies on glue area; a dovetail uses angled tails that interlock mechanically. They are laid out and cut differently and look different on the finished corner.
Sources and revision history
- Fairham, Woodwork Joints (The Woodworker Series, revised edition), the dovetailing chapter — public domain
- Wikipedia: Dovetail joint (terminology and variants)
- Fine Woodworking: All About Dovetail Joints
Revision history
- Published
- Last updated
Related joints
All wood joints
Every joint on the site, live and planned, grouped by how the pieces meet.
Box joint
Square fingers alternate across the corner, every one cut to the same width.
Rabbet joint
Along one edge runs a square step; the mating board sits into it and the corner registers.
Half-lap joint
Each piece gives up half its thickness so the two halves stack back into one thickness.
Miter joint
Two ends cut at half the corner angle meet with no end grain showing outside.
Sliding dovetail joint
Tapered tail, matching housing: a shelf goes in from one end and slides home along it.